Choosing a Major/Minor


Choosing-Major-Image

Greetings and Blessings!!!

Hope you ladies are doing well and are getting geared up to go back to school. For the ladies who are getting prepared for college I hoped you enjoy reading the off to college checklist post. In this post I would like to talk to you about choosing (declaring) a major and/or minor. You will have an academic adviser to help you when you are enrolled in your basic requirements but once you declare a major you will have an academic adviser for that specific department that you will be majoring in. Your academic adviser will be there to help and guide you through during your time as an undergrad. Get to know them build a rapport with them they are there to help you! Now, when you first start off in your classes, you will be taking pretty much your basic requirements (classes) they are just like  refresher courses from high school. Yes, as silly as these classes may seem it is important that you take these classes seriously and pass them. You don’t want anything to come back and prevent you from graduating.


win_subjects2014_380

I believe that most schools would look for you to declare a major and/or minor by the middle of your sophomore year if you haven’t done so during your first year. (I didn’t declare my major until my junior year and I’ll say why towards the end of the post) For some this can be an easy decision because they already have an idea as to what they want to pursue a career in while for others it can be a bit overwhelming.  Finding the right major is a process and it is okay if you don’t know right away what you want to major in. When you are thinking about choosing a major and/or minor it is a good idea to have an invested interest in something. Something that you have a passion for and that you can see yourself doing and wouldn’t consider it a job. It could be arts, music, politics, fashion, photography etc. It is good to get advice or opinions from fellow classmates, friends, family, and your adviser. But whatever you decide it is ultimately up to YOU!! It is important that you seek and pray to God for guidance and direction as well. It is important that you follow your heart. Don’t let the opinions of others sway you from choosing what you want to do to what they want you to. As you go through life, you will learn that it is important to do what makes you happy and not settle. If God gave you a vision then nothing else matters. It is okay if everyone doesn’t understand your vision because he gave it to you not them.

When it comes to minors all departments don’t require you to have a minor along with what your majoring in. But for those that do, a minor is a secondary field that you want to specialize in while you are working on your major. Your major is what your intended career is, but your minor is something you pursue because of your personal interests. With minors you typically have to maintain an C or above in order to not retake any classes and the same goes for what you are majoring in.

I did say I was going to say why I didn’t declare my major til my junior year and this is why when I transferred to the school I received my BA from I was taking Biology courses. I thought I wanted to go to med school and work in a hospital. But I wasn’t as excited and engaged as one should be. So one day I was sitting in my class and physically I was there but mentally my mind was elsewhere. It wasn’t in my heart to do as I thought before. I talked to my adviser and she suggested that I pray about it and I did. I ended up transferring out that department and transferring to the College of Liberal Arts Department and declaring my major as Psychology. It was the best decision that I made and God set it on my heart to do. Yes, there were people who had their opinions about it but it didn’t matter. I was following my heart and I have no regrets about it!

I hope you ladies enjoy reading this post and find it helpful! Remember seek God and follow your heart in all that you do!


Be Blessed


Christina

Off-to-College Checklist

college

Greetings and Blessings!!!!

Hope you ladies are enjoying your summer break!!! But as we all know some good things must come to an end and that means summer is almost over and it will be time to get back to school. Some of you will be entering into middle school, high school, and college. For those of you who are entering into college you are about to embark on an incredible journey that will set the foundation of entering into adulthood. During this time you will experience an abundance of things that will help you and guide you into figuring and finding who you are.

Whether you are leaving off to go to college or staying near home and attending a local university, it is important that you take items that you will need and will be able to fit into your dorm room. But first, you have to make sure you have a checklist.  This checklist helps you in becoming organized but it will help you in getting and having all your basic essential items that you need. The first will be making sure you have all of your paperwork together. This paperwork includes making sure you have your FAFSA filled out and completed, having and making copies of your SAT/ACT test scores, and transcripts. When I was in undergrad I learned to make copies of EVERYTHING and keep the original for myself. I have heard many of times about the financial aid office at my school losing or misplacing a student’s paperwork. You will only need this paperwork when dealing with the financial aid office, you don’t have to carry it around everywhere with you. So in order to avoid anything from happening make sure you have all your important documents placed in a folder. You will be assigned a financial aid counselor and it they will help you with everything pertaining to financial assistance for school. So it is good to build a rapport with them because they will be there to help you if you have any concerns or questions.

The next thing to tackle would be getting things for you to live in your dorm room. Now, I did live in a dorm room up until I transferred to another school and those rooms are not spacious and you really have limited space to put everything once you unpack and get settled in. All dorm rooms have a twin size bed, dresser drawer, closet, mini-refrigerator, and a desk. So it is important that you take with you what you need from home but you can also buy what you need when you get there as well.

PERSONAL SUPPLIES

  • Clothes – The number and kind of clothes you plan to pack will probably depend on the weather conditions of your college, your budget, how often you plan to do laundry and the size of your closet. That said; do not forget essentials such as hangers, belts, underwear, socks, scarves, pajamas and a weather proof jacket. A pair of ballet flats or sandals, boots, and sneakers.
  • Bedding 2 to 3 sets of extra-long twin sheets, pillowcases, a memory foam mattress pad and a quilt.
  • Toiletries– Other than your regular make-up, skin and hair care items, essentials such as a small mirror, nail clippers, nail file, tweezers and wet wipes will come in handy.  Be sure to pack bath time essentials such as toilet paper, bath and hand towels, a shower caddy, soap dish, bathrobe and flip-flops.
  • KitsA tool kit (very necessary), a sewing kit and a first-aid kit which includes vitamins, allergy meds, and pain killers.

DORM ROOM SUPPLIES

  • Dorm decoration some colorful rugs, personal mementos, framed  pictures and wall posters can brighten up your dorm room and make you feel more at home.
  • Dorm Cleaning products and supplies-broom, dustpan, cleaning rags and a wastepaper basket.
  • Kitchen essentials– utensils, a set of basic cookware, mini-fridge (if your dorm doesn’t already have one), dish soap, kitchen towels, storage containers, can and bottle openers, Saran wrap and aluminum foil, chip clips, water, and some disposable utensils.
  • Laundry itemssuch as a laundry hamper or bag, detergent, a clothesline or drying rack and rolls of quarters for laundry.
  • Electronic items– such as a blow dryer, TV, laptop, iron, radio alarm clock, phone, headphones, chargers, batteries, hand-held vacuum, an extension Cord (if allowed by the college) and a power strip.

SCHOOL SUPPLIES

  • Writing essentials– such as pens, pencils, erasers, sharpeners, notebooks, loose-leaf college-ruled filler paper, folders, binders and computer paper to print out assignments.
  • Organizational supplies– such as post-its, thumbtacks, glue sticks, scissors, scotch tape, stapler, paper clips, a desk organizer and a backpack.
  • Study tools– such as index cards, highlighters and permanent markers, USB drives, study lamp or clip-on reading light, clipboard, dictionary  and calculator.

OTHER ESSENTIALS THAT WILL COME IN HANDY

  • A couple of combo locks– for safeguarding valuable stuff in your dorm room or you can purchase a lock-box.
  • Passport or state ID– for colleges and university travel abroad programs.
  • Miscellaneous items– Stamps, envelopes, some favorite books, under-bed storage, umbrellas and duct tape.

These items are pretty much the basics of what you’ll need for living in your dorm room. As you progress each semester, you’ll develop your own pattern in what you need and what you don’t need. Also, having a roommate and interacting and getting to know the other young ladies in your dorm will be an exciting time. Being able to develop a bond and friendships with them is one of the things that’s needed during your first semester of college. Living in a dorm and being right on campus is a great experience.

I enjoyed writing this post, it took me back to when I was just starting off as a freshman in college and how I had to learn and find my own way but I was also glad to have help along the way! So I hope you ladies that are getting ready to start college find this post helpful and I look forward to writing more post about the college experience!!!

Be Blessed

Christina


Skincare Routine for Combination-Oily Skin

Hello everybody!

Today I thought I’d share my evening skincare routine, as since I’ve been doing this I’ve noticed a HUGE difference in my skin condition. I used to have quite bad skin with flares of acne in my T-Zone, recently my skin has been almost completely clear (with the occasional little spot appearing here and there).

First thing I do when I get into bed is cleanse my face with Simple face wipes. I remove all of my make up, sometimes use a second wipe just to make sure all the make-up and dirt that’s built up on my skin over the day is removed. What I love about these wipes are that they’re fragrance free, so no irritation is caused to my skin and it does the job perfectly!

Simple_Kind_To_Skin_Cleansing_Facial_Wipes_7pk_450x450_tcm13-291207

While you’re supposed to cleanse, tone and moisturise your skin, I’ve found a lot of products really don’t suit my skin. Anything for dry skin makes my skin greasy and causes break outs, the same for sensitive skincare products, while oily or combination skincare products really dry my skin out! I’m yet to find a really suitable product for my skin.

If my skin is feeling very oily one night, I give my skin a quick wipe over in ONLY the oily areas using The Body Shop’s Seaweed Clarifying Toner. I don’t always use the toner, as when I used it every night, I found my skin becoming VERY dry, irritated, red and actually flaking. When I use it only when my skin is oily, I find that it really helps to just take that excess oil from my skin and in the morning it feels lovely again!

32601m_z

I then apply a thin layer of Acnecide all over my face, especially taking care in making sure my troubled areas have been covered. I actually got prescribed acnecide from my doctor, however I’m pretty sure it’s something you can purchase.

acnecide


I follow with applying The Body Shop’s Seaweed Clarifying Night Treatment in the same areas, as this helps your skin to absorb what products have been put onto your face as well as helping the natural oils in your skin to sink in. Acnecide has really done wonders to my skin, I give it the biggest recommendation to anyone who is suffering with acne!

32905m_l


If ever my skin is feeling a little dry  in the morning, I actually use a good moisturising cream that focuses on eczema. As I do suffer with eczema, one day I woke up and the only available moisturiser was a perfumed one (NOT suitable for my skin), so I tried the eczema cream and it worked an absolute treat. The next day my skin was back to normal, neither dry nor oily! The most popular cream to use, as I know so many who do use it (including my mum), is Aqueous Cream, and it really is lovely. Just don’t use too much, otherwise your skin does feel oily!

article-1254715-0265B58D000005DC-306_468x286

This was a very short post in comparison to my others, however I hope this helped for anyone with an oily-combination skin type like me! I couldn’t explain how much I love this skincare routine as it really has worked wonders for me! I hope anyone else who tries it will find the same!

Emily Jean

Girls Unite 4 A Purpose, “MYGirls” Blog Series

Greetings beautiful young girls!!


Welcome to Girls Unite 4 A Purpose!!  GU4AP is an organization geared towards inspiring and uplifting females, from young girls to adults, in efforts to encourage confidence, leadership, and self-esteem, as they move through life’s various endeavors & obstacles.  We seek to stress to importance of love & respect for one another, teamwork, cultivating strong alliances & friendships, and service to others.

That being said, GU4AP would like to introduce the “MYGirls” Blog Series, a collection of entries zeroing in on issues that affect young girls, ages 8-18.  The “MYGirls” Blog Series will offer sound advice by illustrating fictitious scenarios that may be familiar in the lives of our girls, as well as personal experience(s) from our Mentors.  The blog series will also open the opportunity for discussions between our Mentors and Mentees, to hopefully break down any fear or shyness when approaching certain subject matter.

Over the next few months (or however much time it may take), the “MYGirls” Blog Series will contain blog entries based on the following subjects:


  • Social Media Etiquette
  • Appearance & Personal Hygiene
  • Academics
  • Leadership & Self-Esteem
    –Competition, “Frenemies”
  • Safety
    –Rape, Self-Defense
  • Health
    –Diet
    –Exercise
    –Mentality


There will be certain blog entries specifically for our girls, ages 12-18 (for these entries, we do advise having a parent or legal guardian present, to read along with you):


  • Commitment, Loyalty, and Relationships
    –Contraception, Sex
  • Health
    –Menstruation


We at Girls Unite 4 A Purpose (GU4AP) want you young girls to know that we are here for you.  We know that you may have questions, concerns, and worries, and we hope that the information we share will give you insight, along with the courage to press forward through life’s challenges.  You have a safe space in the “MYGirls” Program . . . consider this your 2nd home!!


–Kahlelah, “MYGirls”


GU4AP’s 1st annual “Park Beautification Day,” 7/12/14

Whew! What a day it was . . .

As we Mentors made our ways from our respective residences to Towngate Memorial Park in Moreno Valley, CA, we hadn’t the slightest idea of what would be the overall outcome of our 1st annual Girls Unite 4 A Purpose “Park Beautification” event.  We locked in the location, secured our spot for a park bench & BBQ pit, divided the logistics between our awesome Founding CEO & Director of Queens Unite Everywhere (QUE), our Director of Public Relations & “MYGirls,” and Breyawna our fabulous Events Coordinator.  We had Lia, our Mentor & resident Beauty Queen (crowned Miss California Plus America 2014) set up the decorations which turned our day into a beautiful luau . . . and of course, we brought the beverages, food & fixings, along with the #BanBossy workshop supplies and gift bags for all attendees.

Lastly, we had Sasha, Omolara, Faith, and Ty’Kea, our eager Volunteers  who soon became new Mentors. 20140712_111042

Yet, we were short the most important element:  Mentees.

Determined to expect the unexpected and not forget about the reason for the day, we at GU4AP decided to take a small detour, redirecting our focus to training the new Mentors, while leaving the invitation open to any young girl interested in what we had going on.  Prepping our new Mentors for their future Mentor/Mentee relationships, we stressed the importance of communication, leadership, self-esteem, and teamwork; well into our morning #BanBossy workshop, our Mentors were able to exercise leadership and initiative by taking gift bags to a mother and grandmother near our setup, for them to take home to any young girls in their families.


20140712_122658

Our day was running smoothly.  Until a minor setback made it get much smoother . . .

A malfunction with the luau decorations opened up the door of opportunity:  a cluster of our balloons flew a few yards away from our spot, which caught the attention of a group of 5 young girls, ranging from ages 8 to 16.  Shy at first, the girls found interest in GU4AP, and opted to join us for the entire event duration.  The exchanges of names, issuance of food & beverages, gifting of bags, and meeting of parents & sharing of our organization’s purpose, recharged the motivation within all of us to press forward in our quest to reach out to young girls.  Before our very eyes, we saw how expecting the unexpected made for the enjoyment and ending of an overall perfect day!


So, WHY did we do what we did on Saturday morning?  WHY did we reach out to young girls in the communities?

Because there are so many young girls who feel alone, invisible, objectified, scared, silenced, unattractive, unsure of themselves.  There are so many young girls in our communities who don’t have positive role models to look up to.  There are so many young girls who lack goals, aspirations, who have never made any life plans, whether short term or long term.  There are so many young girls with questions, concerns, worries about life, school, the future, and especially what it means to be a Woman. There are so many young girls in our communities who turn to negative entities as outlets.  There are so many young girls who lack confidence, and are yearning for positive ways to express themselves.     20140712_110937


We at Girls Unite 4 A Purpose (GU4AP), which houses Queens Unite Everywhere (QUE) and “MYGirls,” aim to inspire and uplift the young girls in our respective communities, and around the world when our power and outreach increases.  Through activities, workshops, leadership & team-building exercises, writing projects and more, we believe that our work will greatly impact the lives of our young girls, and influence them to be the best of themselves that they could ever be.


Parents, PLEASE get your young girls involved.  If you have daughters, nieces, granddaughters, Goddaughters, etc . . . GU4AP welcomes you!


-Kahlelah, “MYGirls”


July Pamper Day

Hello everybody!

I’ve decided that on the second Tuesday of each month I shall be doing a little Pamper Day post! These posts will go through some products I’ve used – and loved – and have helped me to relax, helped my skin etc. Essentially, it’s a quick little review on some beautiful products that are fantastic to use when you’re feeling down and you need to be pampered!

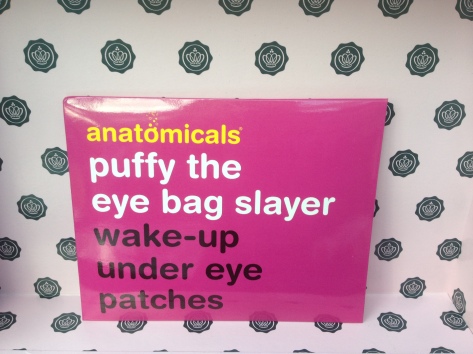
First off, skincare! Thanks to a little God send of a beauty box I am subscribed to, I received these little miracles known as the wake-up under eye patches, or: Puffy the Eye Bag Slayer!

photo 4


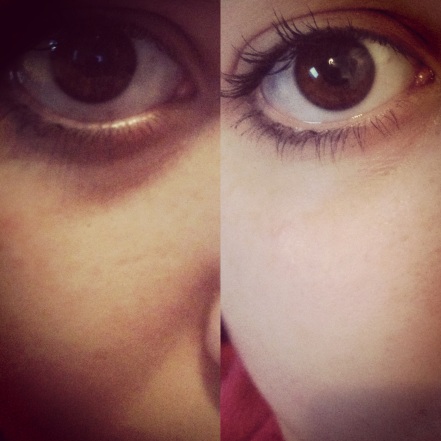
To be quite honest, I was very skeptical about them before I used them, but the results were wonderful! I suffer with really bad dark under eye circles, so sometimes in a morning when I look in the mirror I just think “urrrrgghhhhh what can I do with this?!”. Simple. All you have to do is take an under eye patch out of the slip it’s in, apply it directly under your eye and make sure it’s all smooth and not creased or wrinkling up. You leave it there for 15 minutes and you’re all done! Overall, these little patches make you look that little bit more awake and fresh in the morning! Genius!

photo-3My before and after photo

Of course, no pamper day can be carried through without a face mask! I may have mentioned this incredible product before on this blog, but Glamglow Supermud is just BEAUTIFUL. It leaves your skin so flawless! As you should with any other beauty product, don’t overuse it! People can occasionally put a fantastic product down as being awful, simply because they’re misusing and overusing it. If you overuse a product, it can make your skin so much worse – either greasier or uncomfortably dry. Supermud pulls out all of the impurities in your skin, so naturally your skin can feel a little dry after – so if this product is overused, it really can dry up your skin and it’ll end up taking those good, natural oils out of your skin too (as that will be all there is there for it to suck up!).

Another beautifully gross product to use is Bioré Deep Cleansing Pore Strips. My friend Amber recommended these to me, and I’ve never looked back! They feel a little strange and uncomfortable at first, but they are worth it! After you’ve removed your face mask, leave your nose a little damp and apply a nose strip. Leave for about 10 minutes, remove and check out all of the gross garbage the strip has literally PULLED out of your pores! It is so disgusting, but admittedly, it’s a little satisfying to see that all of the bad stuff is being taken out of your skin!

photo 2

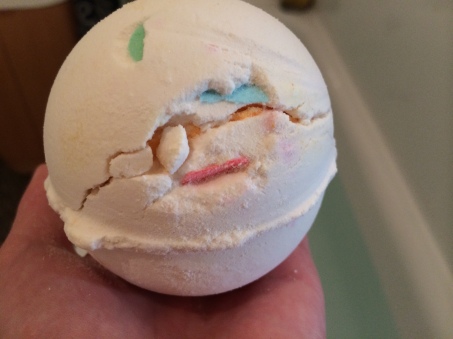
Last but not least, a pamper day is never complete with a nice, relaxing soak in the bath! But what better way to do it than with a bath bomb?! Natural bath bombs made by Lush Cosmetics are currently my absolutely favourite. They smell beautiful and they look amazing and fun! The one shown in the photo below is called Dragon Egg, and yes it is simply incredible. After it fizzes away a few layers letting off what looks like multicoloured confetti into the bath, the centre is cracked into and it starts fizzing, POPPING (there’s those little popping crystal things in there too!) and letting out this beautiful orange cloud into the water. It is amazing! Also, don’t forget to light a couple of candles, get a book, put some nice relaxing music on and just chill out for some time in that brightly coloured, popping and fizzing bath!


photo 2 copy

Have a happy pamper day, ladies!

Emily Jean

Make-Up Do’s and Don’ts

Hello again everybody!

It’s been a couple of weeks since I’ve made a post, which really isn’t great! Things have started to become a little hectic all of a sudden at work and I’m finding myself with very little spare time to get anything done! I’m hoping over the next couple of weeks that will change so that I can focus on blogging and studying again!

Today I’m going to talk through what, in industry, is considered to be the proper order of make-up application and also some do’s and don’ts for mature make-up, glass wearers and contact lens wearers.

When studying the make-up unit at college, we were all a little baffled to learn there is a certain order in which products should be applied. I think we were all a little baffled as of course, we’ve all been applying our own make-up for years, but never really considered there being a “correct” order or applying it! Of course foundation goes before blusher and eye-make up etc. But to hear there was more to it was a little unusual. Some people apply eyeliner before mascara, whereas others apply it after. Some people leave blusher until last, whereas others do it straight after foundation. Some people apply lipstick after their foundation and blusher, whereas others will move onto their eye make-up first! The differences in how people apply their make-up is endless, it’s all down to preference. However, when working on client’s, we’ve learnt there is an order in which you need to apply the make-up.

1. Cleanse the skin and remove any already applied make-up. This ensures all old make-up and dirt is removed so you have a clean canvas.

2. Tone

3. Moisturise! This gives the skin a smooth base to apply your make-up onto, as well as hydrating your skin.

Steps 1-3; cleansing, toning and moisturising is an important part of your daily skincare routine! My first post on MYGirls was based on identifying your skin type in order to learn which products will suit your skin type best! You can find this post, here! I hope it helps.

4. Apply any skin correcting concealers. See my previous post on skin correcting techniques and tips to help you out; here!

5. Apply your foundation. Foundation should always blend into your skin colour perfectly! You can always mix a dark and a lighter foundation together to create the perfect shade for your skin. Always be sure to check that your foundation blends into your hair line and your neck so that there are no sharp, unblended areas of foundation.

6. Blemish concealers. Apply the blemish concealers, the colour closest to your skin type, over any blemishes you wish to hide. This also includes covering up dark under eye circles, thread veins, moles, spots and dark skin pigmentation.

7. If you are using cream products, such as highlighters, shaders, blushers or eye shadows – now is the time to apply them! After applying your cream products, use a loose powder over them to set them.

Step 7 and 8 is when you should be contouring, if you choose to! My post on the basics of contouring may come in use if you wish to try it out! You can find that post, here!

8. If you are NOT using cream products, and are using powder products, ignore step 7. Apply your powder products as normal.

9. Now it’s time for eyeliner! Apply your eyeliner as you wish to. See my previous post on eyeliner techniques to give you some ideas; here!

10. Mascara. Apply a coat or two of mascara to the upper lashes first, then apply to the bottom lashes.

11. Eyebrow pencil. Always apply it in light strokes so that it doesn’t come off patchy or too dark for your hair.

12. Lipliner. Liner helps to enhance the shape to your lips neaps and flawlessly, as well as helping the life of your lipstick last! From the centre of your lips, outwards, work your way around carefully and steadily to create a nice, crisp and defined lip.

25. Lipstick/lipgloss. Apply a couple of coats for a beautiful and even finish! And you’re done!

Mature Make-up Do’s and Don’ts

DO

  • Use a cream foundation (apply with a sponge)
  • Use a cream or liquid blusher (apply with a sponge)
  • Use a light/neutral covering powder
  • Accentuate the eyebrows with an eyebrow pencil
  • Only apply the mascara to the upper lashes
  • Be sure to use non-run mascara
  • Correct any bleeding from the lipstick
  • Press a damp cottonpad over the face – this gives a more natural, less matte finish!

DON’T

  • Apply too much foundation around wrinkles
  • Apply powder if the skin is very dry
  • Apply powder around the eye area
  • Apply cream eye shadow to “crepey” eyelids!
  • Apply mascara to the lower lashes
  • Apply eyeliner or kohl
  • Apply eyeshadow to the lower lid
  • Use pearlised eye shadows or contour cosmetics

Tips for a Glass Wearer’s Make-Up

If you are longsighted, your eyes behind glasses can look pinheaded. You should use clear colours and avoid white, pearly eye shadows as it will reflect on the lenses of your glasses. You need to really focus on lengthening and enlarging the appearance of your eyes. You can accentuate the eye socket by applying a darker shadow to the crease of your eye, make sure to blend it all in neatly. If you use false lashes, they should be short but thick – long ones will touch the lenses of your glasses and cause discomfort! Avoid using kohl eyeliner on the inner rim of your eyes, as it can make them look smaller!

If you are short sighted, your eyes tend to look enlarged and can look a little distorted behind the lenses. Try to avoid bright and powdery eyeshadows, and do not try to accentuate the eye socket as this can actually be quite ageing behind these glasses! If you wish to use eyelashes, preferably choose individual eyelashes. If your lenses are tinted, definitely wear black mascara, and remember to try and use eyeliner sparingly!

Tips for a Contact Lens Wearer’s Make-Up

As you should know, if you wear contacts you should not apply make-up after you have put your contacts in, and you should also take them out before removing your make-up.

DON’T use mascaras with filaments or ones that are protein enriched.
DO use non-perfumed and allergy tested products, you don’t want to cause any irritation to your eyes with or without contacts in anyway!
DON’T use powdery eye shadows, any bits that fall into your eyes will feel very scratchy and unbearable!
DO use products with a low oil content. If any oily products enter your eyes, they may cause a few problems with your contacts!
DON’T use heavily pearlised products.
DON’T use kohl eyeliner on the inner rim of the eyes
DON’T use hairspray after inserting your lenses! You should always spray it before putting them in.

Thank you for reading, ladies! I hope this post comes in use to you.

Emily Jean